Oct 27, 2024
Exploring Rust by Building a Load Balancer: Insights from EchidnaLB

I have been tinkering with Rust for some time now and it was about time to delve deeper into it. EchidnaLB is my first experience working with a Rust project. While I initially found the language’s emphasis on safety and its unique approach to variable borrowing and ownership challenging, the learning curve was well worth it. Rust’s low-level control, especially compared to languages like Go and Java, was both demanding and rewarding. Although the build times can be slower as compared to many other higher-level languages, Rust’s performance and reliability are very well appreciated. Now, let’s dive into the project itself: a custom load balancer!
Load balancing plays a crucial role in the pursuit of fast, efficient web services. EchidnaLB — a layer 7 load balancer written in Rust — aims to address these needs with performance and reliability at its core. Leveraging Rust’s memory safety and concurrency strengths, EchidnaLB offers modern load balancing tailored for high-traffic applications.
Key Features
EchidnaLB is built to support HTTP/1.1 and HTTP/2 protocols, ensuring compatibility across various clients and backend services. It provides robust IPv4 and IPv6 support, allowing flexibility in networking environments, and offers TLS termination with configurable SSL certificates for secure HTTPS handling. Additionally, the load balancer supports multiple algorithms, including:
- Round Robin
- Least Connections
- Weighted Round Robin
- IP Hashing
- Least Latency
Each method addresses unique traffic distribution needs, making it adaptable for various use cases.
Configurability & Health Checks
EchidnaLB’s configuration file allows users to define backend servers, choose load-balancing algorithms, and set worker counts for optimal performance. Health checks are also configurable, with options for interval and custom route paths, helping monitor and maintain backend server health effectively.
Performance & Scalability
Built with Rust, EchidnaLB harnesses high concurrency without sacrificing memory safety, making it an excellent choice for scalable, high-performance applications. The support for both HTTP protocols and IP versions further extends its adaptability in distributed systems.
Hands-On: Running EchidnaLB Locally
Here’s a step-by-step guide for locally setting up three backend servers, configuring EchidnaLB, and testing its load-balancing capabilities.
For the demo, it is assumed that you’ve already downloaded one of the many pre-built binaries from the GitHub release page. Otherwise, you’d have to build it yourself.
Step 1: Set Up the Backend Servers
We’ll start three simple HTTP servers locally. Each server will respond with “Hello, World! From: <server-port>".
Create a Rust file, server.rs, with the following code:
use actix_web::{get, App, HttpServer, Responder};

#[get("/")]
async fn greet() -> impl Responder {
    format!("Hello, World! From: {}", std::env::var("PORT").unwrap())
}

#[actix_web::main]
async fn main() -> std::io::Result<()> {
    let port = std::env::var("PORT").expect("PORT must be set");
    HttpServer::new(|| App::new().service(greet))
        .bind(("127.0.0.1", port.parse::<u16>().unwrap()))?
        .run()
        .await
}
To start three instances of this server:
- Open three terminal windows.
- In each terminal, run the following commands, replacing
<port>with 3001, 3002, and 3003 respectively:
PORT=<port> cargo run
For example:

Step 2: Create the Load Balancer Config File
Next, we’ll configure EchidnaLB to balance requests across these servers. A very minimal config will be used for this demo.
Create a YAML file, config.yaml, with the following:
algorithm: "RoundRobin"
port: 9000
backends:
  - url: "http://127.0.0.1:3001"
  - url: "http://127.0.0.1:3002"
  - url: "http://127.0.0.1:3003"
This file specifies the load balancing algorithm (Round Robin), the port where EchidnaLB will listen, and details for the backend server endpoints.
Step 3: Start EchidnaLB
Now we’re ready to launch EchidnaLB with this configuration.
In a terminal, navigate to your EchidnaLB project directory and run the following after appropriately updating the config file path:
./echidna-lb --config ./config.yaml

EchidnaLB should start up, listening on port 9000.
Step 4: Test the Load Balancer
With everything running, you can now test the load balancer by making requests to it:
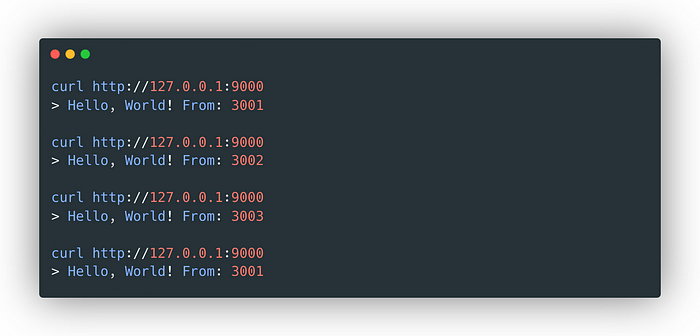
curl http://127.0.0.1:9000
Since we’re using the Round Robin algorithm, you’ll see the response cycling between the three backend servers:

Reflecting on the Experience
Building EchidnaLB was a great introduction to Rust’s strengths and nuances. I learned to appreciate Rust’s meticulous handling of memory and data safety, and I’m excited to leverage it for more system-level programming. EchidnaLB combines performance, safety, and flexibility — qualities I’m eager to explore further as I continue working with Rust.